Pics of the rebuild can be seen here
My son bought his first car a few years ago, a 2000 Dodge Intrepid with 80K+ miles for $1500. He used it for getting back and forth to school and work, and it seemed like a decent car. The underside doesn't have a spot of rust, and all he really had to do to it was a set of tires and some air struts for the trunk lid. Last fall he was driving around, and it started making a knocking noise. He brought it to the local garage, where they pretty much told him the car was toast (rod knock). He didn't have money to put in it, and I was busy with other projects, so it sat for 8 months until he got some cash together and I got some time cleared on my schedule. Meanwhile I spent a lot of time reading up on the car at dodgeintrepid.net.
From the research I did, in retrospect if he had to do it over again, I would have steered him towards a different car. The 2.7L seems to have a predisposition for spun rod bearings, and a lot of people advising to swap the 2.7L for the 3.2L or 3.5L. So we were kind of stuck, should we junk the car and just buy something else? Or put some cash into the Dodge and see what happens? His budget was about $1500, right around the area where you can run across a real bargain, or buy something that turns out to be worse than what you already have. So we did some pricing on a rebuild kit - around $500 on Amazon, a replacement connecting rod - $60 on Amazon and a rebuilt crankshaft - $225 at AutoZone. We decided to pull the engine, throw it on a stand, pull the oil pan, and check the bearings. If it was only a rod bearing and everything else looked OK, we'd rebuild it. If the main bearings were spun, we'd throw the engine in the trunk and call the junkyard.
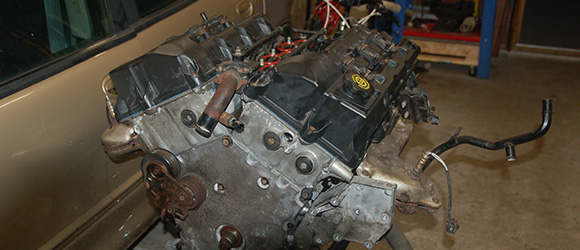
So we spent a weekend pulling the engine and getting it on a stand. We could have done it in a day, but you spend too much time trying to figure out how to pull apart electrical connectors without damaging them that it ends up taking way longer than it should. On the stand, we flipped it, pulled the oil pan, and right away found the bad connecting rod on the number 3 piston. We pulled all the main bearing caps, but everything looked good, so we decided to rebuild it. We ordered the parts online, and while we waited for them, stripped the engine down to the block and cleaned everything. The rebuild kit included bearings, pistons, wrist pins, rings, gaskets, valve guide seals, water pump, oil pump, 3 timing chains, primary timing gears, timing chain tensioner guides, and a tensioner for $509. I have no clue where the parts were made, undoubtedly overseas somewhere, and I've read every comment stating that I should buy Mopar parts, and this and that and whatever. If the parts I bought last half the life of the parts I pulled out, the car will be 25 years old. More than likely the trans will go before these parts will, so I don't have any regrets for using no-name aftermarket parts.
The second weekend found us stripping parts off the block, and piling them onto a folding table trying to keep all the bolts straight as to where they needed to go. When we finally got the block stripped, I took a look at the piston bore, and it didn't even have a ridge at the top. You could still see the cross hatch on the cylinder walls. I also saw no evidence of any sludge from a failed water pump, however all the internals had the appearance that the oil had been cooked. The valve guide seals were so hard, my kids thought the rubber parts were metal. One of the theories I found on the internet was that the bearing issues with this engine were caused by conventional oil breaking down due to high heat, and that synthetic was the key to keeping it running. Anyway, I finally got to use the Harbor Freight solvent tank I got for Father's Day last year, I filled with a bucket of Oil-Eater cleaner I bought from Costco and diluted it to 2 parts water. Every part went into the solvent tank, including the block, where they were cleaned, rinsed off with water, dried off with compressed air and oiled.
The third weekend found us putting the engine back together. The only part that gave me any anxiety was putting the timing chain on correctly, and in retrospect was much easier to do than anticpated. The first thing I did was watched a video from Cloyes on YouTube which cleared up some of the confusion. A couple things to note, if you reuse the tensioner, you have to purge all of the oil out of it so you can compress it to get it back in. I fooled around with the old one, and was able to do this easily in a vise. Once purged, you compress it almost all of the way, and it stays compressed. You then install it, use a pry bar to compress it all the way, and it releases. After playing around with the old one in the vise, I had no issues with getting the new one in. The second issue was that the cams get installed with all the valves closed. You then install the primary timing chain lining up all the marks, you're then instructed to put a breaker bar in the end of the camshaft, and to turn it - forcing it to open some valves - until the mounting holes line up and you can get the bolts in. But they don't tell you which way to turn the camshaft. After watching the video, I decided to turn them in the direction that would require the shortest amount of travel to get them to line up - around 20 degrees. All I could recall reading was to only turn the valve assembly clockwise so nothing skipped time, but I ended up turning at least one of the camshafts counter-clockwise to get the mounting holes lined up with no ill effects. Once complete It appeard that the one timing mark on the seconday timing chains lined up with the timing marks on the primary, but I could find nothing in the FSM that said it should or shouldn't.
We swung the engine back into the engine bay on the following Wednesday, worked on it Thursday and Friday night, and wrapped it up on Saturday morning of the 4th weekend. The procedure outlined in the FSM available on dodgeintrepid.net was fairly accurate for pulling the engine, except a few minor points. The process stated to pull the power steering pump from the bracket, and move it to the side. Pulling the pump is impossible without also removing the idler pulley bracket at the same time, and fighting to get the pump out without removing the idler bracket is probably how it broke. It also discusses removing the starter. In order to remove the starter, I found I had more room to get at it by also removing the trans lines that run to the radiator. I also found I had more room by pulling both the oil and trans dipstick tubes. Without a doubt though, the starter was the most difficult piece to remove. Save yourself a lot of trouble, and use an air ratchet get at the mounting bolts.
Once we had everything bolted in, we pulled the fuel relay, and cranked the engine over for a minute or so to prime the oil pump. We popped the relay back in, and tried starting it, and it cranked for about 10 seconds, and fired right up. The engine has been running fine since. Outside of the rebuild kit, we did have to also replace the following: Broken idler pulley bracket that we're unsure if we broke it trying to get the power steering pump out, or it was already broken. A broken driver's side motor mount. We replaced alternator because it's kind of a pain to get at once everything is put together, and I didn't like how the bearings sounded on the old one. The EGR valve as all of the bolts holding the pipes from the intake plenum and to the exhaust manifold sheared off when we tried to unbolt them. We also broke the knock sensor when we took the block off the stand and rolled it over to remove the rear seal retainer to get the crankshaft out. (Remove the retainer after taking off the flywheel and before you put it on the stand) Thermostat housing (which cracked when I tried reinstalling it without having the gasket properly set), thermostat and belts. Oil filter. New antifreeze, oil, and a couple of quarts ATF to replace what leaked out from pulling the colling lines and dipstick tube. new battery as the old one was dead, and noone is sure how old it was, and the oil pickup tube as you could see metal chunks in the screen from the old bearing.
Total cost of the project was around $1800, and the time to rebuild the engine was around 36 hours. Most of the 36 hours was spent cleaning. The heads probably took about 8 hours just to strip them, clean them, replace the valveguide seals, clean all the sludge from the exhaust valves and the scraping remnants of the head gasket from the mating surfaces with plastic scapers. Plan is to change the oil at 500 miles with synthetic, and then see how long it lasts.